Tuesday, April 30, 2013

UNDER THE MICROSCOPE: Lime Crime Velvetines (Review, Pictures, Swatches)

Tonight's much anticipated "Under the Microscope" is on the (reasonably new-ish) Lime Crime Velvetines!

The Velvetines have caused quite a stir in the makeup world since their release. Lime Crime were never expecting them to be such a hit! They are always in high demand, with restocks selling out in minutes as everyone tries to get their hands on this much coveted liquid lipstick! Lime Crime's last big restock was April 1st (luckily it was no April fool's joke!), and I was lucky enough to get my hands on both of the Velvetines (Red Velvet and Suedeberry) and the Quill Uniliner (review to come).

Long story short: They've arrived, I've tried them and now to present my findings! (that would have been a fabulous pun if I was reviewing their Carousel Gloss... might keep that in mind! lol)

The packaging of these is very dapper! Metallic red lid with fancy print, and a frosted tube. Inside is the traditional gloss style wand with the velvety tip! (was that another pun...? haha). The packaging is actually a little smaller than I expected, but you still get 3gms of product (equivalent in weight to a MAC lippy!). They also smell like 100's & 1000's Oreo's! But, the smell does disappear when the product is dry! (Which I am quite pleased about!)

When I'd seen the promo pictures of the Velvetines on the Internet, I can't say I was overly excited. Red Velvet looked too dark for my liking and Suedeberry looked like some funny red colour - I didn't know what to think of it! haha. So lets look at some photos!:
Lime Crime Velvetines: Red Velvet (Top) and Suedeberry (Bottom)

When First Applied: Red Velvet (Left) and Suedeberry (Right)
Red Velvet: A beautiful, deep, glamorous red! The sort of red you would wear if you were dressed up to the nines for a fancy occasion! I always seem to think of the 1950's when I see this colour!
Suedeberry: A nice, bright coral (YES, CORAL!! I COULDN'T BELIEVE IT!! I thought it was just a funny red colour! lol) with a hint of pink (the photos show the orange side, but I do think there is a streak of pink there in real life!). Lime Crime describe it as a "warm, vibrant strawberry red"... Sorry, I only see coral! (which is a good thing for me at least!)
You can see the dry "Velvetine" texture below (does look more velvet-y in real life too!):
When Dry: Red Velvet (Left) and Suedeberry (Right)
I must apologise, I smudged my swatch a little... I got distracted opening parcels and BAM! Smudged :( and due to my very dry/already stained hands I have limited swatching opportunity! lol (pretty sure these will stay put for the next week as no amount of makeup remover can get it out of the dry spots!)
(The smudging did happen while they were still damp, so please don't let it deter your opinion on the product - as you can see the bottom is still perfectly in tact!)

In the interest of honest reporting, I will say I did have better luck with Suedeberry than Red Velvet. So, I will say what is awesome about Suedeberry and comment on Red Velvet where necessary! The formula is FANTASTIC! Once it sets it does stay put really well! (do give it a good chance to set for best results! It can take longer than you expect so be patient!) I can give my fiance a peck on the cheek and he doesn't end up covered in lippy! (usually the case!). There is some transfer, but it isn't excessive like most lipstick products! Suedeberry did not bleed AT ALL! I even wore it WITHOUT lip liner to test it! It didn't budge either! AWESOME! But, you can somewhat expect that from a product that sets dry! (Red Velvet bled a tiny bit (nothing too drastic) but this could be rectified with a bit of lip liner! I may have had it on a bit thick!). You also only need the tiniest amount of either for full, opaque coverage! I worked with a very light hand for Suedeberry (as I was worried about it setting and flaking off like I have had happen with some other longwearing lippies... trust me it's not pretty!). It went on easily (I was actually suprised how accurately I could get it on for such a slippery product!) and I didn't touch it up ALL DAY. It lasted through both lunch and dinner. Of course, after dinner there was much more noticeable fading (I had eaten two meals and had a few bevvies by this point!), but I still had quite a bit of colour! I think where I may have come unstuck is that I may have (unknowingly) been a bit more heavy handed with Red Velvet. I did have a harder time getting it on too, possibly because it's a darker red (which probably explains my issues!). I am super clumsy with dark reds - I manage to get them everywhere and Red Velvet was no exception. Have you ever heard of the saying that red nail polish is always the hardest colour to paint with? I wonder if the same goes for lipstick?!

So yes, I did find Red Velvet did wear well, but Suedeberry, for me, wore much better. Suedeberry was what I was expecting from the Velvetines, where as I found Red Velvet more like a matte red lipstick (which is not a bad thing, just not what I was hoping. Does that make sense?). If I wear Red Velvet again and have better luck with it, I will definitely update this to let you know! (It may not be for a while... So much other stuff to test out! haha).

My pick: Suedeberry. I feel the colour is more everyday friendly, and I also had a better luck with it than Red Velvet.

I was thoroughly impressed with these, and if they are released in other colours (which I believe they will!), I will be chomping at the bit to get my hands on them!

You can buy Lime Crime directly from them (www.limecrimemakeup.com) for USD$16.99 or from Lipstick Republic (www.lipstickrepublic.com.au) for AUD$21.00. At the time of posting, Lime Crime still have some Velvetines in stock and Lipstick Republic will be getting them in soon :)

Happy hunting!
Love,
Your PM x

Sunday, April 28, 2013

UNDER THE MICROSCOPE: Kryolan Satin Powders and HD Pigments

Hello,

I'm on a bit of a blogging roll at the moment (I am trying to reduce that list that's longer than the Great Wall of China...) so tonight's second post (my first was my Top 5 MAC Picks) is on my little collection of Kryolan Satin Powders and HD Pigments.

A few people in my neck of the woods haven't really heard of Kryolan, but they make some great stuff! They aim for the Stage/TV makeup artists, but that doesn't mean the everyday makeup lover can't use their products! I swear by their TV Paint Stick for concealer, and I also love their translucent powder!

There are 16 available colours in the Satin Powder collection (I have four) and there are 16 available colours of the HD Pigments (I have three). I wanted to swatch the few I have, because I struggled to find swatches of them on the net when I went to buy mine. So hopefully if you are in the same predicament, this helps! 
Top: HD Pigments
Bottom: Satin Powders
The HD Pigments are supposed to be of a higher quality, and have good adhesive properties to bare skin (I will agree with this as I tried to use a HD Pigment with NYX eyeshadow base and it wouldn't grab!). The main difference, formula wise, between the HD Pigments and the Satin Powders is that the Satin Powders have a talc base and the HD pigments do not (good if you are allergic to talc, which some people are!).

First, the Satin Powders:
(L-R: White Gold, Rose Gold, Champagner, Majestic Green)
White Gold: A white base with a prominent gold shimmer. This would work great on the inner corner of your eye or as a brow highlighter (or both!).
Rose Gold: Looks alot more pink in the jar but on the skin is a nice soft candy pink with a gold shimmer. Very pretty and girly!
Champagner: A champagne coloured bronze. It's not a full on bronze (like Napoleon Perdis' Copper Element) but is a nice medium between gold and brown. This was the most metallic/shimmery of the Satin Powders.
Majestic Green: A green base with a green shimmer. It reminds me of a grass green. Can't say I love it, but I think this one would be great used with a Khaki green colour.

TOP TIP: For more intense colour, I press my loose pigments onto a base such as NYX Eyeshadow Base (there are others you can use but I use that one, and like it, so I recommend it! lol) to help keep the colour intense and lasting longer!

The HD Pigments:
(L-R: Dolomite, Marble, Emerald)
Dolomite: This has SUCH an interesting finish! It is a nude-y pinky lilac and the finish isn't like a sparkly metallic and it isn't quite matte. It's really hard to describe but it's awesome!
Marble: A really pretty pale sparkly purple! A really intense colour! Would be nice to mix into your everyday makeup routine!
Emerald: A beautiful green! It's an intense green and is simply stunning! If you love greens and wear green eyeshadow, this will not disappoint!

The texture of the HD Powders are different to the Satin Powders. The Satin Powders are a powder, and if someone says to me "loose pigment" that is the formula I expect. The HD Pigments are a bit clumpier (which I'm sure would be due to the absence of talc!). They remind me of a smaller version of MAC's Crushed Metallic Pigments!

Stats-wise, you get 3gms of Satin Powder for AUD$18 (VERY competitively priced) and for the HD powder you get 3gms of powder as well (though Dolomite is marked at 6gms... bit confused there?) for AUD$32. After swatching them side by side, you really can notice the difference in quality. The Satin Powders aren't bad quality, but the HD powder is just so much better! If you are one that is pedantic for quality, go for the HD powders if you will get the use out of them! If you aren't sure if you will get much use, and there is a colour you like, the Satin Powders are not too much of a strain on the hip pocket!

My picks: Dolomite (simply for the finish), Emerald (for the colour) and White Gold (for the versatility).

In Australia, you can buy Kryolan from www.kryolan.com.au and in Melbourne (for those in Melbourne) there is a shop in Little Collins St (so you can try till your heart's content!).

Have you used Kryolan before? Which products do you like?

Love,
Your PM x

PM'S TOP FIVE: MAC

Hello again,

Time for another instalment of PM'S TOP FIVE, with today's focus being MAC Cosmetics. I will certainly not deny my love for MAC lippies, but there are a few other products of theirs that I really like! (yes lippies will feature! lol). So here goes:

My MAC Top Five!
Amplified Creme Lipstick in Morange
3gms for AUD$36
Morange Lipstick
Anyone who knows me well, knows my love for Morange! It would have to be one of my favourite lipsticks, easily! I am having the biggest orange phase at the moment (hopefully a lasting phase), I think mostly started by Morange! It is a deep, bright orange that leans more red than yellow (thank goodness becuase otherwise I couldn't wear it! Yellow based anything makes me look like I have jaundice!). Morange is one colour I reach for over and over again! The colour also lasts really well, and touch-ups are seldom needed! (I do wear it with Illamasqua's Hex Pencil to ensure that there is no bleeding!). I love all of MAC's Amplified Creme finishes, and if orange is not your thing, I do recommend you try another shade!

Mineralize Rich Lipstick in Lady at Play
4.04gms for AUD$46

Lady at Play Lipstick

The Mineralize Rich lipsticks have only been out for a few months, but Lady at Play quickly cemented a place in my heart! Not only is the colour beautiful (it is a slightly pink leaning bright coral), the finish is great and it feels great on your lips! It goes on light as a feather, I don't find it drying and it has a magnetic cap (also a rather nifty feature!). The colour looks a bit sheer on my hand, but it does go on to be pretty opaque (I was actually quite suprised when I swatched it that it was so sheer!). It also lasts pretty well for such a creamy/shiny lipstick! (You are more prone to losing it when you eat lunch, but aside from eating, barely any touchups are needed!). You can see me wearing Lady at Play in my FOTD here.

Powder Blush in Mocha
6gms for AUD$41

Mocha Blush
Mocha Blush

Mocha is a great everyday blush! MAC describes it as a "soft plum-pink". I think it's reasonably accurate, as you can see the plummy undertones, but I'd almost be more inclined to describe it as a "neutral dusty pink" (you can see a brown-y streak in the photos!). It's a matte blush (which I am a huge fan of), and it is easily buildable and blendable! Again, one of the harder ones to stuff up! Mocha would also be a great pick for the cooler months becuase of that darker undertone!

Pearlglide Intense Eyeliner in Undercurrent
1.2gms for AUD$33

Undercurrent Pearlglide Liner
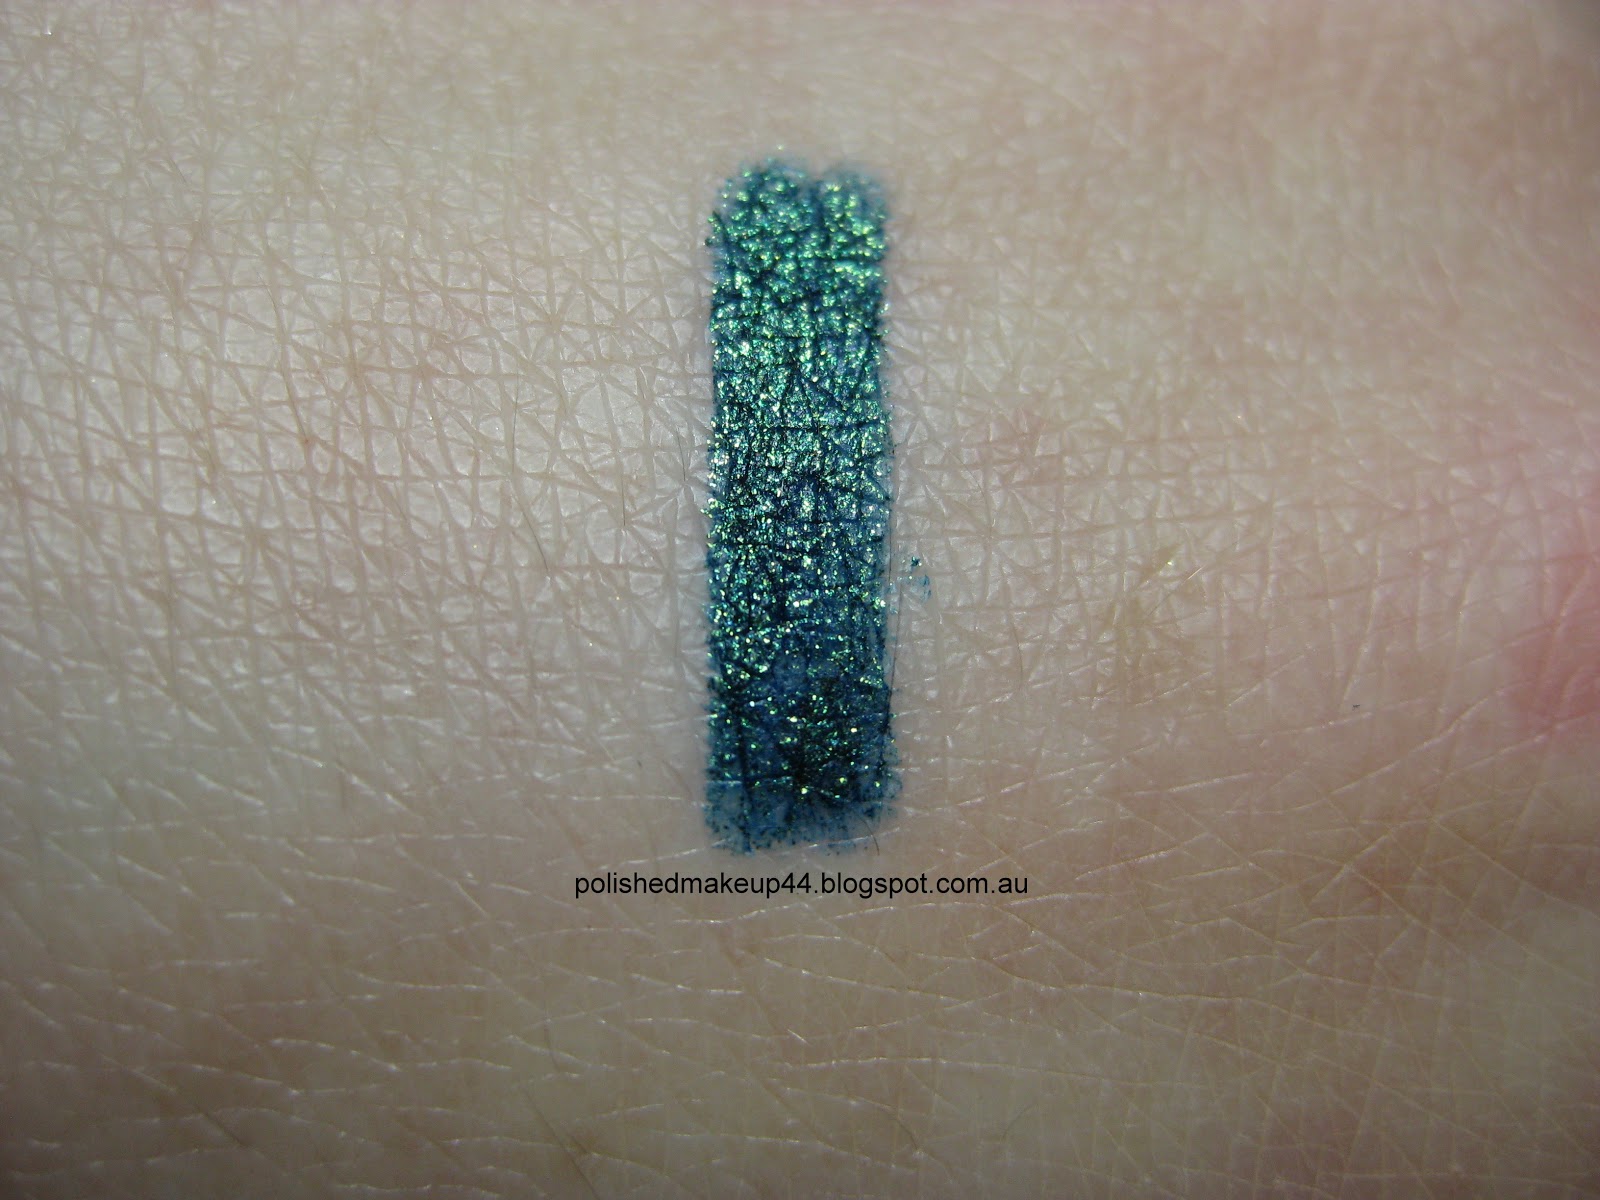
This is an absolutely beautiful colour! I am a sucker for teals/greens and this is no exception! Undercurrent is a blue base with a gold and green shimmer! *swoon*. Pearlglides are also an amazing formula, and feel like butter when they go on! (probably softer than butter they're that soft!). They also set a bit so they last pretty well and barely budge! They are a bit hard to come by... You can't buy them off MAC online (in Australia anyway). I got Undercurrent from my closest PRO store, but if you're lucky you may snag one from Myer or DJ's (I have seen them there since my trip to PRO). If you saw the Archie's Girls pencils that were recently released, they are also pearlglides! I strongly recommend trying one, they are well worth it!
Hot tip: Because of the glitter content, they are not recommended for use in your waterline (can irritate your eyes).

Paint Pot in Blackground
5gms for AUD$35
Blackground Paint Pot
This is my go-to product for smokey eyes these days! (Black ones anyway!). Since using this for my smokey eyes, I get them done in 1/4 of the time... It really makes them that much easier! Anyone who has done the generic black smokey eye knows that for a good one, you need to go back and keep building the black up... and it takes FOREVER! Well, instead, use Blackground, applying it to your mobile lid and then press on your black eyeshadow ASAP! Paint pots are a cream product and do set dry, so the quicker you get your shadow on there the better. Becuase it sets, I try and keep it out of the crease because otherwise it gets hard to blend). You could wear by itsself if you were that keen, but I probably wouldn't recommend it as it is a bit tricky to get even. If you aren't keen on the black one, there are heaps of other colours to try! They are very popular as bases for your eyeshadow (Painterly in particular is one popular with MUA's).

Do you agree with my picks? Any MAC products you can't live without?

Love,
Your PM x

Saturday, April 27, 2013

POLISH FOR YOUR POLLEX: Zoya Pixie Dust Collection

Hello,

Tonight you get another instalment in "Polish For Your Pollex", the Zoya Pixie Dust Collection! Yesterday I posted the very beautiful Zoya Ornate collection (hopefully I'm not peaking too soon! haha).

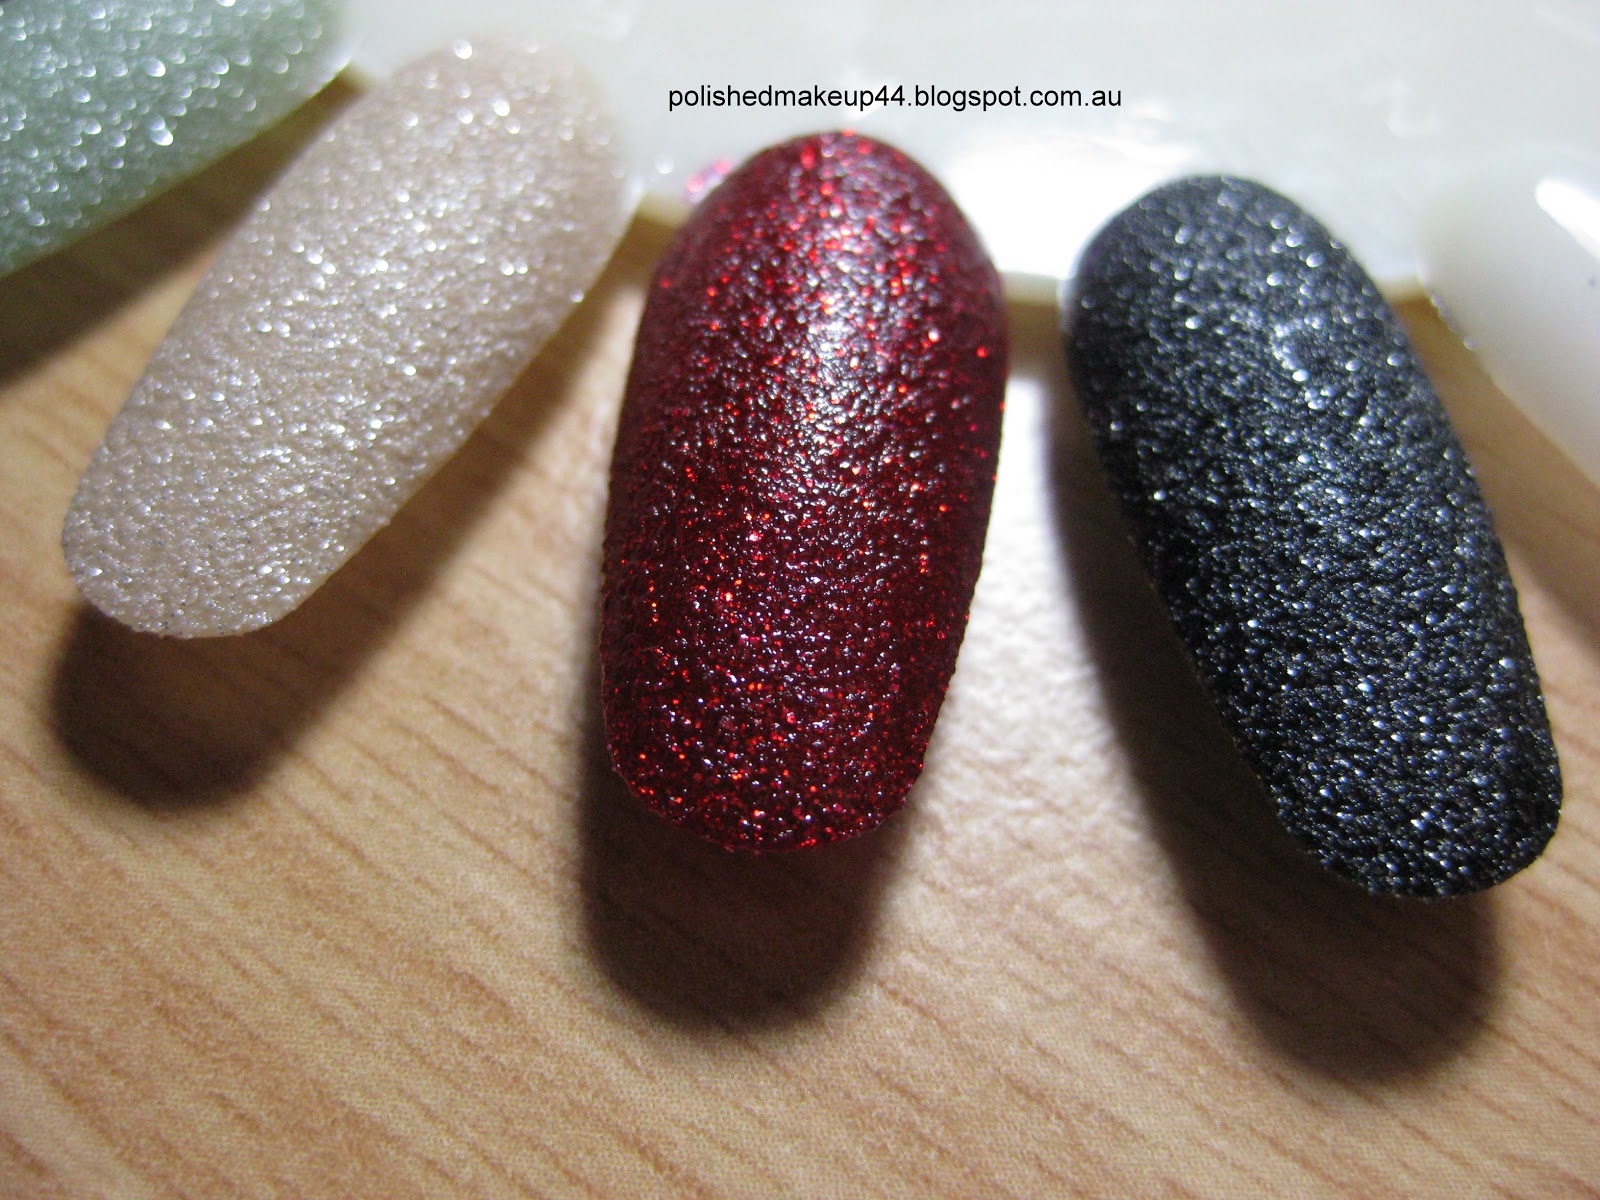
If you are into nail polish even just a little bit, you would have probably seen that textured polishes are all the rage at the moment, with just about every brand bringing out their take on it! Have you seen the OPI's 'Liquid Sand'? This is the same sort of idea! Zoya's take is the 'Pixie Dust' collection. The Pixie Dust collection is a sparkly, matte, textured polish "infused with magic and wonder"! I believe it was released around the end of February, and Zoya have just released a summer collection of the Pixie Dust polishes in the US! (which look ah-mazing!)

Handy hint: Zoya recommends no top coat or base coat with this polish (I accidently used a base coat when I tried out Dahlia the other week and it didn't really affect it!) You can put a top coat over them (your fingers won't fall off!) but you will lose the matte, textured effect (which is the point of the Pixie Dust range!).

The Pixie Dust collection is a set of six polishes:
Zoya Pixie Dust
They look really sparkly and pretty in the pack! Now for some swatches:
Zoya Pixie Dust
Dahlia: Black base with silver glitter. It is a really interesting one and like Storm from the Ornate collection, if solid black is not quite your thing, this is a good alternative! This was the first one I tried and I was quite impressed with it! It kind of reminds me of a starry night sky!
Chyna: This is the only one that doesn't have silver glitter. This is a red base with red glitter (it may have been silver glitter that turned red? I'm not sure). It really reminds me of China Glaze's "Ruby Pumps". It's super sparkly and if you are going to wear top coat with any, I strongly recommend this one!
Godiva: A nude base with silver glitter. This is a really pretty plain one! It'd be one of those job interview appropriate ones that is still interesting to look at but isn't all in your face! It actually looks alot nicer swatched than it does in the bottle!
Vespa: A dusty green base with silver glitter. I have this one on now and it comes out a bit dustier on my fingies! A good one for spring.
Nyx: A nice sky blue base with silver glitter. This one leans the tinest bit purple and is another good one for spring!
London: A grey with silver glitter. Is this implying that it is based off the actual London? haha. It is a nice mid-toned grey and almost has a slight greeny tinge under certain light!

(L-R: Godiva, Chyna, Dahlia)
(L-R: London, Nyx, Vespa)
You can really see the texture and the sparkle close up! Texture wise, it's actually a bit smoother than I was expecting! It does feel grainy (and has a habit of holding onto things you get on it like hair dye and makeup!) but not much more grainy than a 120-odd grit nail file (except it's smooth!). Wear time is about standard for me (starts to chip after a few days!) but as I've said, my nails are soft as marshmallows so if your nails are nice and healthy you should hopefully get about five days out of your colour!

This Pixie Dust collection is a good introductory one, with a wide range of colours that are appropriate year-round. I would be interested to see what colours they come up with next winter if they bring a collection out... Navy perhaps? Darkened teal? mmm... Delightful!

My picks: Dahlia (becuase it's not a stark black), Godiva (a good all-rounder) and Chyna (try it with top coat!)
 
In terms of availablity, Zoya is rather hard to get in Australia. The collections are usually a few months behind the US (mostly becuase they are seasonally aimed!). I buy most of my Zoya now from Art Of Beauty Australia (www.zoya.com.au). The new collections (including Pixie Dust) aren't up on their website at the time of posting but I imagine you should be able to ring up and place a phone order if you wish. I have also ordered Zoya before from Aussie company Salon Style (www.salonstyle.com.au). The retail price for Zoya is AUD$19.

Do you like the new textured polish craze? Which are your favourites from the Pixie Dust collection?
 
Be kind to your Pollex!
Love,
Your PM x

PM'S TOP FIVE: Illamasqua

Hi everyone!

Yes, I am having a bit of an Illamasqua phase at the moment... Though my love for their stuff will not die off anytime soon! (They have a new collection, Paranormal, due for release on the 30th of April! WOOHOO! I'm SUPER excited to see what will come out!)
In the past few days I have put their Pure Pigments and Blush Duo's under my makeup microscope! :)

Anyway, the PM's Top Five will bring you my five favourite products from a particular category (brand, colour scheme, product etc) and explain why I love them so!

First off the blocks for my Top Five is Illamasqua. Here are my five favourite Illamasqua products, in no particular order:
My Illamasqua Top Five!
Skin Base Foundation
30mL for AUD$41 from Myer
This is, without a doubt, the best foundation I've used to date! I love that it matches my skin tone (I'm a 6), it is one of the best matches I found. It comes in 26 different shades, so there is bound to be something to suit your skintone! They even make a pure white shade (so no more dilemmas for those pasty folk about their foundation being too dark!). It is also one of the longest lasting foundations I've worn. After 8-10 hours it still looks perfect (except on my nose but that's because nothing ever sticks to it!). It is suitable for all skin types and coverage is easily buildable, it can be worn sheerer or heavy depending on your preference. You can see me wearing Skin Base in my FOTD here!

Eyebrow Cake
4.5gms for AUD$22 from Myer
Eyebrow Cake in Vehement
I swear by this for my eyebrows. My brows are not as defined or sharp as some of the others you see on the net (I like the look, but I don't think it'd suit me) but I am a firm believer that brows need some attention as part of your routine. I have brows that are more dense than some, but filling them in still makes a huge difference! I use the cake dry with an angled brush and simply fill them in... easy! The cake comes in 6 shades. I use Vehement (the darkest shade... as you can see, quite dark!). You can also use the brow cake in conjunction with Illamasqua's sealer gel to make your brows waterproof and smudge proof (they do last pretty well anyway!). Handy to note though that using sealer gel makes the cake darker (I can't use my cake with sealer gel... it's WAY too dark!). Using it dry gives you a much more natural look.

Blusher in Tremble
4.5gms for AUD$28 from Myer
Blush in Tremble
Blush in Tremble
There are so many pretty blush colours by Illamasqua, it's hard to settle on one! Tremble is the blush I find myself reaching for the most often! Illamasqua describe it as a "soft lilac pink"... to be honest I can't really see where the lilac comes in. Directly under bright lighting it looks pink, but under everything else I can see a peachy tone (perhaps my eyes are broken?), which I think makes it a great all-occasions blush. It's not so pink that you look like you've been rubbing your cheeks in candy, but it also complements any orange/peachy toned lipsticks you wear with it. It's quite pigmented, so a little does go a long way, but it still blends out really nicely and it's one of the harder colours to stuff up! I had to put in two photos for this becuase it wanted to play hide and seek with the camera! I promise it shows up more in real life!

Bronzing Duo in Glint/Writhe
2x4gms for AUD$39 from Myer
Glint (left) and Writhe (right)
I have already displayed my love for this bronzing duo in my Easter Feaster and Bargain Makeup-ing breakdowns. I love this for its versatility. You can use it as a bronzer, contour, highlighter and eyeshadow. The powders feel really silky and of high quality (not the sort of quality you expect when you think bronzer in a pan... well for me anyway!). I am not a big bronzer wearer so if I go for a bronzer, I want something that I will get a bit of use out of for other purposes. This is perfect for that!

Lipstick in Scandal
4gms for AUD$25 from Myer
Scandal Lipstick
Not only are these lipsticks fantastic value, they are SUPER long lasting. Barely any touch ups are required and they are pretty good for staying where you put them (those clumsy are unlikely to smear them half way across their face!). I will note here they can feel a bit drying, so they don't suit everyone, and your lips need to be in excellent condition to wear them, but you can smooth a bit of balm underneath to help with that! (not too much though or it can get patchy). The plus side of them being on the dry side is no bleeding! lol. That being said, Scandal is probably one of the creamier of the bunch, I didn't find much drag when I swatched it. Scandal is a stunning pink leaning coral. It's also deep enough that it complements many skin tones. It really is a beautiful colour! I recommend it if you want to try something new that's not pink or red, but you aren't game for orange. It also looks nice with Tremble blush!

Please note: I have quoted Australia's Myer prices for these products, but you can also purchase them from www.illamasqua.com and they do ship internationally!

What are your favourite Illamasqua products? Any you can't live without?
There are plenty more Top Five's to come in the near future!
Love,
Your PM x

Friday, April 26, 2013

POLISH FOR YOUR POLLEX: The Zoya Ornate Collection

Hello,

This post marks a new branch in the Polished Makeup tree - Polish for your Pollex! For those wondering, your Pollex is your thumb! (or big toe... but don't worry... no big toe photos, I promise!).

Polish for your Pollex is where I will group my ramblings about polish (a bit like how Under the Microscope is for makeup). As this blog was to include polish too, I thought it was about time to kick things off a bit more seriously rather than just show you what colour I've painted my nails!

Todays PFYP will be on the Zoya Ornate collection. This has been out in the US for a little while, but I was lucky to pick it up at Salon Melbourne (I am a qualified Nail Tech for those curious!). It is a winter-marketed holiday collection, that was released around October/November in the US (which is an Aussie spring/summer). I was a little sad I couldn't get it over here at the time becuase I feel it's perfect for Christmas time! Nonetheless, It'll be good for the Aussie winter that is just around the corner!

Zoya Ornate
Very eyecatching in the pack! I'm pretty sure I squealed with excitement when I saw it! You know what else is awesome about it?... HOLO'S!! This is the first time Zoya have done holo's and in the bottle they look pretty amazing! There are six colours in the Zoya Ornate collection (sorry but you get them swatched on a nail wheel becuase my poor cuticles wouldn't be able to cope with all the acetone! lol):

(L-R: Electra, Ziv, Logan, Storm, Blaze, Aurora)
Electra: A holographic silver bar glitter! BAR GLITTER!! Awesome! It's not often polish companies come out with bar glitter (though Zoya did with their Gems & Jewels collection a year-or-so ago!). It reminds me of OPI's Save Me (minus the blue of course). Would be good for layering also! (But it is dense enough to get it solid if you want to!)
Ziv: A beautiful gold foil! Nice golds are hard to come by (let alone foils!) but this one is nice and not too yellow! It almost leans a little bronze! It's a real glam colour!
Logan: If Charla and Ivanka had a little polish baby, I think this is what it'd look like! While it's not as bright as those two (you can definitely notice the darker undertone) you can definitely see the Charla-esque influence! A beautiful green with a streak of blue foil-y gold shimmer!
Storm: HOLO! A shiny black with a scattered holo. It's good if you like black but a solid black polish isn't your thing! The holo definitely gives it more interest! I am still a bit sad Zoya called this one Storm and not Ebony! (maybe next winter I'll get lucky...)
Blaze: Another holo! I have seen others describe it as red, but I would call it burgundy. I feel it's too dark and you can see too much pink to call it red! This one has got really good depth to it, I think the base and holo particles get along well in this one and make it look like it's got some red glitter going on! I have already worn Blaze and I was suprised to see it went on much darker than I was expecting!
Aurora: The final holo of the lot. A beautiful mid-purple! This one has the most holo of the lot and is super sparkly! I'm pretty sure your eyes would fall out if you saw it in the sun! LOL! It reminds be a bit of the OPI DS Original that is no longer available! (I'm pretty sure they aren't even close but any purple holo I see I think of DS Original! lol).

All of these swatches are painted with three coats. For Blaze and Aurora I could have got away with two but I thought I'd keep things even! And for some close-ups:

(L-R: Logan, Ziv, Electra)
(L-R: Storm, Blaze, Aurora)
PHWOAR! Check the holo! Super pretty! Zoya have defintiely done a good job of this collection! Zoya make great polishes and they are the big five-free! (No formaldehyde, formaldehyde resin, toluene, DBP or camphor! All nasty ingredients you don't want in your polish!). What I love most about Zoya is their range of colours and finishes! They always try to come out with something a bit more original when they release a new collection! Zoya brushes are thinner than OPI's (for those that have never used Zoya) and a few from this collection did have a stray hair (first time I've had that happen) but they are perfectly easy enough to work with!

My picks: Logan (I can't go past a good green!) and Aurora/Storm (for awesome holo-y goodness!)

In terms of availablity, Zoya is rather hard to get in Australia. The collections are usually a few months behind the US (mostly becuase they are seasonally aimed!). I buy most of my Zoya now from Art Of Beauty Australia (www.zoya.com.au). The new collections (including Ornate) aren't up on their website at the time of posting but I imagine you should be able to ring up and place a phone order if you wish. I have also ordered Zoya before from Aussie company Salon Style (www.salonstyle.com.au). The retail price for Zoya is AUD$19.

Have you used any Zoya's previously? Which are your faves?
Until next time,
Be kind to your Pollex!
Love,
Your PM x

UNDER THE MICROSCOPE: Illamasqua Pure Pigments

Hello,

Today's "Under the Microscope" is on Illamasqua's Pure Pigments. I have been in love with Illamasqua since they released their SkinBase foundation and my mother convinced me to try it! haha. They are a cult British brand, who are slowly becoming more recognised in Australia! (They have received a lot of good publicity lately for dropping their prices in Aus to be more in line with the overseas markets... Absolutely awesome I say!). I also love that they have a bit more outrageous colour palette (teal lipstick and purple blush anyone?!) but can still appeal to the everyday. I have six of their pigments. Five are still listed on the Illamasqua website, and one is no longer available (I will swatch it anyway, so sorry if you really like it... You may get lucky and find it somewhere!). There are ten colours in total currently up on the website!

The Illamasqua website describes their pigments as "a metallic, high-shine, pure colour powder". I agree. They are beautiful pigments and very eye catching! While I do not find the whole colour palette appealing (read: the red one), I really love the colours I have and I feel they are a good mix of day, night and fun!

Something handy to note: I usually wear my loose pigments with a base underneath to help them stick! I use the NYX white eyeshadow base, smoothing it on to the places where I want intense pigment and then pressing the pigment on. If you want a sheerer/more subtle look, you can use without a base and blend them out with a brush (I do this for the crease of my eye). I find loose colour pigments like these blend out really well!

Now for the fun part... pictures!:
(L-R: Alluvium, Android, Beguile, Chasm, Furore, Incite)
Top Row L-R: Alluvium, Android, Beguile
Bottom Row L-R: Chasm, Furore, Incite
Alluvium: This is SUCH an interesting colour and it is much more impressive in the flesh. It's a deep blue with red and gold shimmer/sparkle. The shimmer is more apparent if densely packed on, but it would be great combined with black for a majestic smokey eye! It's rather unique because of it's sparkle!
Android: A charcoal grey with a pink/green shimmer. I must admit, I was expecting it to be blacker and I was a little disappointed when I got it but it's still a great colour. Like Alluvium, would be great paired with black for a smokey eye! This one a bit more glitzy than majestic though! lol
Beguile: A white pigment with a pink/green shimmer. It is a bit like Android's albino sister! haha. Probably the sheerest of the bunch but it does perk up over a base. You could potentially use it as a glitzy brow highlight if you were feeling game/80's! haha.
Chasm: A beautiful turqouoise with a greeny/gold shift. One of my favourites becuase it's such a pretty colour! (Along with coral, I have a strong fondness for teals/turquoises!) I have compared Chasm in a dupe test which you can view here!
Furore: A nudie/champagne colour. This is a good every-day colour. You could use it as a brow highlight, or also on the inner corner of your lid. One if my favourites due to it's versatility! You can see I have used this one the most!
Incite: This is the one that is no longer available on Illamasqua's website. It is an intense bronze shimmer and is the most pigmented of the lot, a bit sad that it has been disappointed becuase it's a lovely colour!

The packaging of these is not too bad but can be a little awkward if you're clumsy like me! The base is clear so you can see what colour you're looking for (I do very much like this!) and there is a sifter-like divider inside. It is not your traditional sifter, more a hole so you can get the stuff out but you won't lose the lot if you drop it! (anyone who has dropped a pigment knows you get colour from here to Timbuktu... absolutely everywhere!). However, if you throw these in your makeup bag and they get shaken around a bit, quite a bit of pigment can settle above the sifter/divider and can get messy when you open it! (I know this from experience so just a little FYI! lol). The lid can also be tricky to get off if you've got no nails (also another tip from experience! haha).

Value wise, you get 1.3g of powder (not the most generous but still reasonable) for GBP£15.50 (that's about AUD$25). However, the Illamasqua website (www.illamasqua.com) often have them reduced and I've picked up most of mine for less than full price! In Australia, you should be able to get these from Myer, but for some reason the Myer website refuses to show them. I am sure I have seen them in store recently but I can't be 100% sure. If you are after them and are making a special trip, ring your Illamasqua counter first :)

My picks: Alluvium and Chasm (for the colour) and Furore (for the versatility).

Until next time,
Happy shimmering!
Love,
Your PM x

Wednesday, April 24, 2013

UNDER THE MICROSCOPE: Illamasqua Blush Duo's

Good day!

Today marks my one month blog-a-versary... So a big thank you if you are a regular reader/supporter of my blog! I really appreciate your support. This blog is something that I've wanted to do for a very long time and I'm really enjoying it! I have a list of things to post about that is longer than the Great Wall of China so make sure you keep popping back to see what I get up to!

Now, with all the mushy-ness/formailities out the way... Lets get down to business!

Tonight's "Under the Microscope" are the Illamasqua Blush Duo's. These were officially released with their latest I'MPerfection collection, though one duo (Lover/Hussy) was out before Christmas (testing the waters maybe?).

There are three current Blush Duo combinations:
- Lover/Hussy (apricot/candy pink)
- Beg/Bronzarella (dusty rose/copper)
- Katie/Ambition (baby pink/dirty neutral pink)

Top Left - Beg/Bronzarella, Top Right - Lover/Hussy
Bottom Left - Katie, Bottom Right - Ambition

At this point I should note, I owned Katie before the Katie/Ambition duo came out... I have since bought Ambition, as I didn't feel the need to double up with the duo! At least this way you can see the size difference and still get the right swatches! :)

These blushes are matte (with the exception of Bronzarella and Ambition - which have some shimmer). I actually really like matte blushes. Sometimes I find if a blush is too shimmery, I feel like a barbie doll... Not desirable. Blush is supposed to mimic that natural flush you get, and even though you may not use natural colours, you don't sweat sparkles when you are all flushed! Therefore, mattes are a winner for me! (Of course, you can use a highlighter if you want a touch more glow.)

Now for the stats:
Weight: 2 x 2gms (4gms total)
(One single blush is 4.5gms)
Price: AUD$39
(One single blush is AUD$28)
Therefore, the single blush works out to be a better buy (more weight and less cost), but you only get one colour! If you like both colours in a duo and would use them both equally, the duo is still a good way to go! Otherwise, if you prefer one colour over the other, you can buy it individually instead! The only colour you can't get individually at the moment is Bronzarella, so if you really want it, you'd have to buy the duo! (but Beg will be good for winter so don't panic!). They MAY bring it out at a later date but I wouldn't have a clue whether that will happen!
Where to buy: In Australia, selected Myer counters stock Illamasqua, and you can also buy from the myer website (www.myer.com.au) or from the Illamasqua website (www.illamasqua.com) and they do ship internationally! Woohoo!

Now let's check out some swatches! (I apologise in advance for swatching on my hairy arm but my forearm and hand is stained from all the lippies I've been testing! My bad!)

 
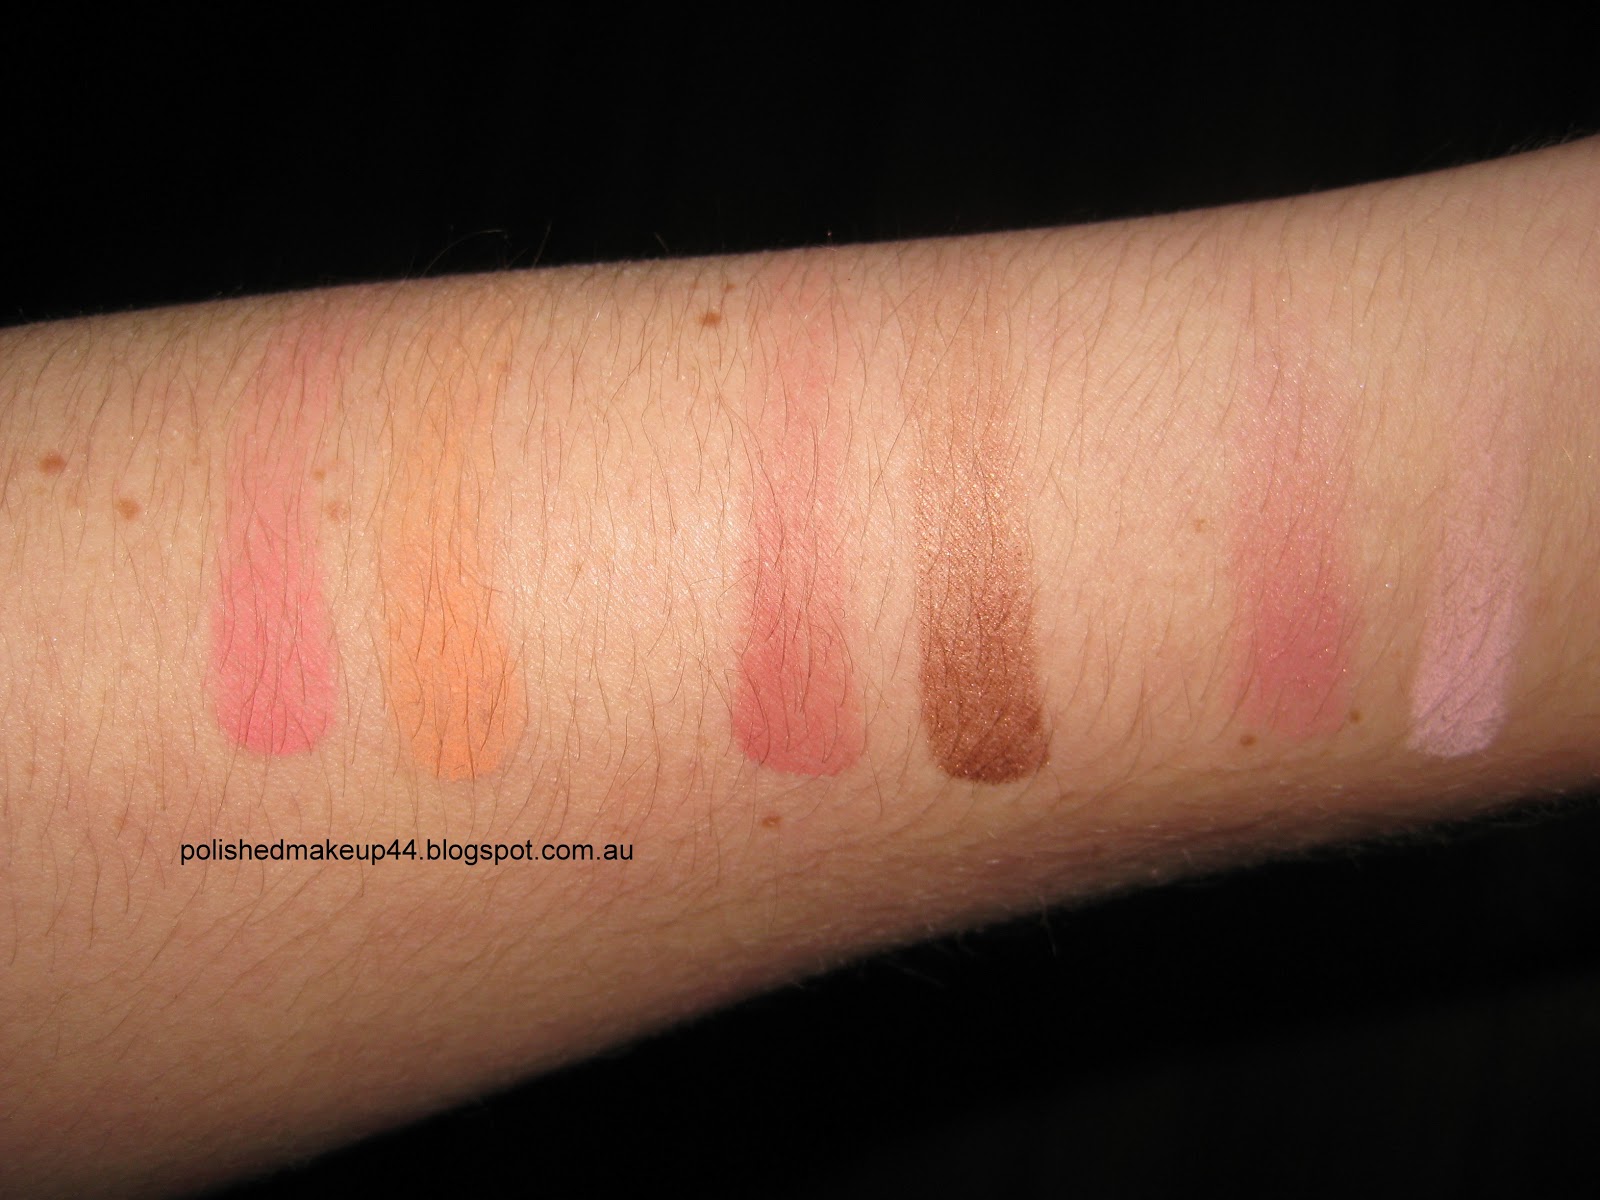
L-R: Hussy, Lover, Beg, Bronzarella, Ambition, Katie
(they are grouped in their duo's)

L-R: Hussy, Lover, Beg, Bronzarella, Ambition, Katie
(they are grouped in their duo's)

I really like all of these colours (who am I kidding I pretty much love any blush as long as it's not really glittery!). I feel Lover/Hussy is more appropriate for summer, Beg/Bronzarella for winter and Katie/Ambition all year round. I would recommend Katie/Ambition if you want an everyday appropriate combo. They are also the more fool-proof of the bunch. While they are all very pigmented, Katie and Ambition are just that little bit lighter, making them not as easy to stuff up (the others you need to work with a VERY light hand). I would likely wear Katie/Ambition the most out of the three. (I'm glad I have them individually!) Bronzarella is also really silky and I feel it would make a great eyeshadow. Therefore, if you want a handy eyeshadow/blush combo, go for Beg/Bronzarella! Bronzarella could also be good for a sneaky little contour if you're feeling game! It's also good to note here, Beg is more red based than Ambition, which is more pink (and does have a slight gold shimmer - though it doesn't translate heavily on the cheek - you can see me wearing it in the selfie in here but it's not overly noticeable thanks to the goggles).

Illamasqua make some great products, and if you don't own any, blush is a good place to start!
Do you own any Illamasqua blushes? If so, which ones do you own?

Happy blushing!
Love,
Your PM x